티스토리 뷰
iOS 기준으로 설명을 진행합니다.
Step 1. Fastlane 설치
a) Fastlane을 설치한다 (이하 홈브류 이용하여 설치)
brew install fastlane
Step 2. Firebase 인증
a) 어떤 Firebase 인증방법을 사용할것인지 선택한다.
1) 플러그인의 로그인 작업을 통해 Google 계정에 로그인
2) Firebase 서비스 계정 사용자 인증 정보 사용
3) Firebase CLI를 사용하여 로그인
여기선 Firebase CLI를 사용하기로 결정
b) Firebase Tool 설치
Firebase Tool을 설치해주자.
콘솔에서 다음을 입력하면 설치가 된다
curl -sL https://firebase.tools | bash
c) firebase 로그인
콘솔에서 다음을 입력해 로그인을 하자
firebase login
Step 3. Fastlane 초기 설정
a) 콘솔의 위치를 프로젝트 디렉토리로 이동한다.
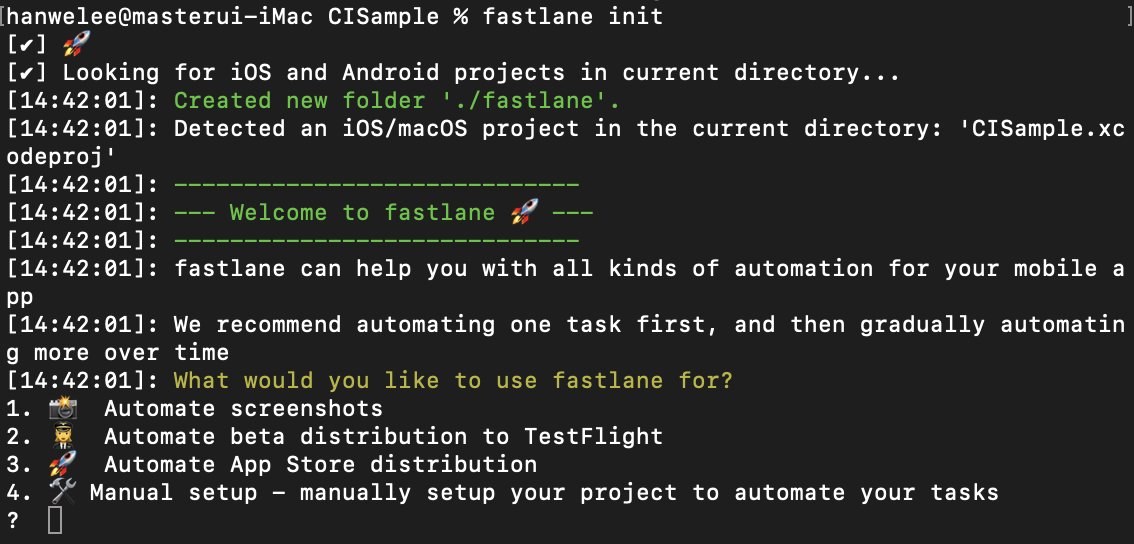
b) Fastlane의 기본설정파일들을 생성해준다
fastlane init
우선 4번을 눌러주자.
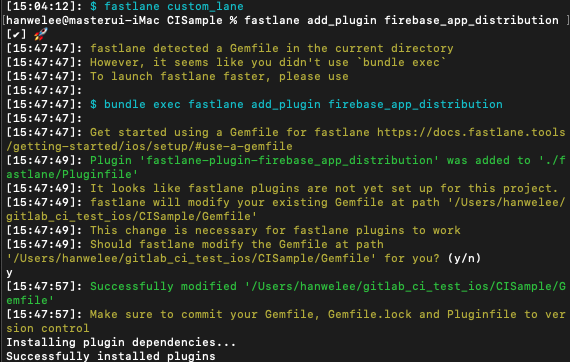
c) firebase Plugin을 설치해주자. iOS프로젝트 루트에서 해당 명령어를 실행시키면 된다.
fastlane add_plugin firebase_app_distribution
Step 4. Firebase AppDistibution 프로젝트 생성
a) https://console.firebase.google.com/ 페이지의 AppDistribution 메뉴로 이동한다.

b) iOS 프로젝트를 생성하자.

c) 프로젝트의 pod 에 Firebase/Analytics를 추가하자
pod 'Firebase/Analytics'd) AppDelegate의
func application(_ application: UIApplication, didFinishLaunchingWithOptions launchOptions: [UIApplication.LaunchOptionsKey: Any]?)에 다음 코드들 추가하자
FirebaseApp.configure()
Step 4. Fastfile 설정 및 앱 배포 테스트
a) 간단한 Fastfile을 만들어주자.
platform :ios do
    desc "My awesome app"
    lane :distribute do
        # match(app_identifier: "com.hanwe.CISample10", type: "adhoc")
        build_ios_app(workspace:"CISample.xcworkspace", scheme:"CISample", configuration: "Debug", export_method: "ad-hoc", output_directory: "./fastlane/distribute") # build_ios_app is a built-in fastlane action.

        firebase_app_distribution(
            app: "// 파이어베이스 앱 아이디를 넣자",
            firebase_cli_token:"// 파이어베이스 CLI토큰을 넣자",
            groups: "test", // 파이어베이스 테스트 그룹을 넣으면 된다.
            release_notes: "Lots of amazing new features to test out!"
        )

    end
end
b) console에서 fastlane을 실행시켜주면
fastlane

1번 선택!

배포성공!

앱을 다운로드 받을 수 있다.
Step5. 브랜치에 커밋이 되면 자동으로 특정 그룹에 배포가 되게 만들기
a) Firebase App Distribution에서 그룹을 여러개 만들자.

b) Fastlane Fastfile을 수정해주자.
platform :ios do
    desc "My awesome app"
    lane :distributeToDev do
        # match(app_identifier: "// 앱 번들 아이디", type: "adhoc")
        build_ios_app(workspace:"CISample.xcworkspace", scheme:"CISample", configuration: "Debug", export_method: "ad-hoc", output_directory: "./fastlane/distribute/debug") # build_ios_app is a built-in fastlane action.

        firebase_app_distribution(
            app: "// 파이어베이스 앱 아이디",
            firebase_cli_token:"// 파이어베이스 CLI 토큰",
            groups: "test", // 테스트 그룹
            release_notes: "Lots of amazing new features to test out!Dev!"
        )
    end

    lane :distributeToTest do
        # match(app_identifier: "// 앱 번들 아이디", type: "adhoc")
        build_ios_app(workspace:"CISample.xcworkspace", scheme:"CISample", configuration: "Release", export_method: "ad-hoc", output_directory: "./fastlane/distribute/release") # build_ios_app is a built-in fastlane action.

        firebase_app_distribution(
            app: "// 파이어베이스 앱 아이디",
            firebase_cli_token:"// 파이어베이스 CLI 토큰",
            groups: "dev", // 테스트 그룹
            release_notes: "Lots of amazing new features to test out!Master!"
        )
    end

end

일단 App의 Configuration을 변경해가며 하는걸로.. 스킴을 바꾸거나 다른옵션을 입맛대로 바꿔서 설정하면 되는듯 함
c) CI에 fastlane 실행 스크립트 넣기

이 부분은 어떤 CI를 사용하느냐에 따라 달라질듯 함. 중요한것은 위의 fastfile의 lane 이름을 구분해서 실행시켜주도록 하자.
d) CI를 돌려보자.

e) 실제로 잘 올라갔는지 확인해보자.

참조: https://firebase.google.com/docs/app-distribution/ios/distribute-fastlane?hl=ko
'프로그래밍 > 개발환경' 카테고리의 다른 글
| XCode Cloud 사용해보기 (0) | 2022.09.19 |
|---|---|
| Tuist 적용해보기 (0) | 2022.06.15 |
| GitLab Runner를 이용해 CI 구축하기 (0) | 2021.11.15 |
- Total
- Today
- Yesterday
- Secure Enclave
- modulemap
- module map
- iOS wallet
- XCodeGen
- Swift 니모닉
- firebase distribution
- cicd
- ios
- widget extension
- Gitlab Runner
- RxSwift
- Delegate
- isSecureTextEntry
- SwiftUI
- associated type
- flatMap
- 순환참조
- cd
- Protocol
- Fastlane
- Tuist
- iOS 니모닉
- 니모닉
- iOS Mnemonic
- CI
- arc
- Objective-C
- XCode Cloud
- swift
| 일 | 월 | 화 | 수 | 목 | 금 | 토 |
|---|---|---|---|---|---|---|
| 1 | 2 | 3 | ||||
| 4 | 5 | 6 | 7 | 8 | 9 | 10 |
| 11 | 12 | 13 | 14 | 15 | 16 | 17 |
| 18 | 19 | 20 | 21 | 22 | 23 | 24 |
| 25 | 26 | 27 | 28 | 29 | 30 | 31 |
